hostbill支付宝模块bug
用户支付账单后会出现重复入账,少则一两次多则七八次。。。。
不排除支付宝跳转返回的时候用户F5刷新导致重复入账。。
附bug截图

运行“gpedit.msc”打开“组策略编辑器”
计算机配置 -> Windows 设置 -> 安全设置 -> 本地策略 -> 安全选项
“交互式登陆:不需要按 CTRL+ALT+DEL”改为“已启用”
显示“关闭事件跟踪程序”
计算机配置 ->管理模板 -> 系统
显示“关闭事件跟踪程序”改为“已禁用”
<?php
class Kloxo extends HostingModule {
//Version
protected $version ='1.00';
//Description
protected $description='Kloxo provisioning module';
//Enable AJAX
protected $ajaxLoadValues=true;
//End INIT
//Translations
protected $lang=array(
'english'=>array(
'acc-type'=>'Account Type',
'resource-plan'=>'Plan Name',
'dns-template'=>'DNS Template',
),
'german'=>array(
'acc-type'=>'Account-Typ',
'resource-plan'=>'Plannamen',
'dns-template'=>'DNS Schablone',
)
);
//End Translations
//Server Settings APPprotected $options = array(
'option1' =>array (
'name'=> 'acc-type',
'value' =>false,
'type'=> 'select',
'default'=> array("customer","reseller"),
),
'option2' =>array (
'name'=> 'resource-plan',
'value' => false,
'type'=> 'input',
'default'=>false,
),
'option3' =>array (
'name'=> 'dns-template',
'value' => false,
'type'=> 'input',
'default'=>false,
),
);
//account specific stuff below
protected $details = array(
'option6' =>array (
'name'=> 'domain',
'value' => false,
'type'=> 'input',
'default'=>false
),
'option1' =>array (
'name'=> 'username',
'value' => false,
'type'=> 'input',
'default'=>false
),
'option2' =>array (
'name'=> 'password',
'value' => false,
'type'=> 'input',
'default'=>false
),
);
//End User Specifics
//Start Action Handler
protected $commands = array(
'Suspend','Terminate','ChangePackage','ChangePassword','Create','Unsuspend'//,'getResourcePlansInfo'
);
//connection
private $server_username;
private $server_password;
private $server_hostname;
private $server_ip;
public function connect($connect) {
$this->server_username = $connect['username'];
$this->server_password = $connect['password'];
$this->server_hostname = $connect['hostname'];
$this->server_ip = $connect['ip'];
if($connect['secure']) {
$this->port = 7777;
$this->http = "https";
}
else {
$this->port = 7778;
$this->http = "http";
}
}//endconnection
//Default Kloxo JSON Processing
public function lxlabs_get_via_json($protocol, $server, $port, $param) {
$param = "login-class=client&login-name=admin&login-password=pass&output-type=json&$param";
$url = "$protocol://$server:$port/webcommand.php";
$ch = curl_init($url);
curl_setopt($ch, CURLOPT_POST, true);
curl_setopt($ch, CURLOPT_RETURNTRANSFER, true);
curl_setopt($ch, CURLOPT_SSL_VERIFYPEER, false);
curl_setopt($ch, CURLOPT_SSL_VERIFYHOST, false);
curl_setopt($ch, CURLOPT_POSTFIELDS, $param);
$totalout = curl_exec($ch);
$totalout = trim($totalout);
//Replace require JSON.php START X0001
require_once('JSON.php');
//end Replace X0001
$json = new Services_JSON();
$object = $json->decode($totalout);
if (!is_object($object)) {
print("Fatal Error. Got a non-object from the server: $totalout\n");
exit;
}
return $object;
}//end Kloxo's JSON
private function Send($type, $param) {
$http = "http";
if ( $http == "http" ) {
$port = '7778';
}
else {
$port = '7777';
}//end SetDefaultPort
$adminpassword = $this->server_password;
$adminuser = $this->server_username;
$serverloc = $this->server_ip;
$builtparameter = "login-class=client&login-name=$adminuser&login-password=$adminpassword&output-type=json&". $param;
$get = $this->lxlabs_get_via_json($this->http, $serverloc, $this->port, $builtparameter);
return array(
'success'=>true,
);
}//End Send
//CreateServer
public function Create() {
//Build the string
$string = "action=add";
$string .= "&class=client";
$string .= "&v-plan_name=". $this->options['option2']['value'] ."";
$string .= "&v-type=". $this->options['option1']['value'];
$string .= "&v-contactemail=". $this->client_data['email'];
$string .= "&send_welcome_f=off";
$string .= "&v-domain_name=". $this->details['option6']['value'];
$string .= "&v-dnstemplate_name=". $this->options['option3']['value'];
$string .= "&v-password=". $this->details['option2']['value'];
$string .= "&name=". $this->details['option1']['value'];
//Finish building string $string
//send data
$type = null;
$senddata = $this->Send($type, $string);
if ($senddata['success']) {
$this->addInfo('Account has been created');
return true;
}
else {
return false;
}
}//End Create Server
//Suspend
public function Suspend() {
//Prepare string
$string = "class=client";
$string .= "&name=". $this->details['option1'];
$string .= "&action=update";
$string .= "&subaction=disable";
//End Prepare String
$type = null;
//Send Data
$senddata = $this->Send($type, $string);
if ($senddata['success']) {
$this->addinfo('Account Suspended');
return true;
}
else {
return false;
}
}
//End Suspend
//Unsuspend
public function Unsuspend() {
//Prepare string
$string = "class=client";
$string .= "&name=". $this->details['option1'];
$string .= "&action=update";
$string .= "&subaction=enable";
//End Prepare String
$type = null;
//Send Data
$senddata = $this->Send($type, $string);
if ($senddata['success']) {
$this->addInfo('Account has been unSuspended.');
return true;
}
else {
return false;
}
}
//End Suspend
//Kill Account
public function Terminate() {
$string = "action=delete";
$string .= "class=client";
$string .= "name=". $this->details['option1']['value'];
$type = null;
//Send Data
$senddata = $this->Send($type, $string);
if ($senddata['success']) {
return true;
}
else {
return false;
}
}
//Finish the murder
}//End Extension
?>
第一种办法用用fuser,一般远程登陆的都可以直接喀嚓掉,但是如果遇上是在终端上直接登陆的就得用who找出pid然后kill。
[root@Server ~]# w
 16:05:59 up 284 days,  1:47,  2 users,  load average: 0.22, 0.07, 0.02
USER     TTY      FROM              LOGIN@   IDLE   JCPU   PCPU WHAT
root     xvc0     -                02Feb13  6.00s  0.00s  0.00s -bash
root     pts/0    X.254.168.X    16:11    0.00s  0.00s  0.00s w
通过w命令查找出pts的ID,然后fuser对其可以下手除掉了。
fuser -k /dev/pts/0
终端上登陆的时候不会有pts,这就得直接对进程下手了.
[root@Server ~]# who -Hu
NAME     LINE         TIME              IDLE          PID       COMMENT
root     xvc0         Feb  2 20:01   .               1313
root     pts/0        Apr 28 16:11   .               24240     (X.254.168.X)
使用who -Hu就直接能定位出其PID,然后对其下黑手,
kill -9 1313
上面两种办法就能顺利干掉登陆的账号。
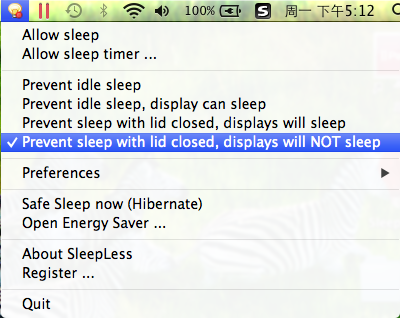
需要挂机/外出或者是只用外接显示器的时候合上盖子Mac会自动休眠,虽然带SSD系统休眠/恢复很快,系统自带没有相关的设置这时候打开sleepless就可以轻松搞定。
sleepless2.8.1下载点这里sleepless2.8.1.zip
sleepless2.8.3下载地址http://download.cnet.com/SleepLess/3000-18512_4-34360.html
解压文件后在选择“Prevent sleep with lid closed,display will NOT sleep” 就好了,未注册情况下会有一个小气泡广告,购买收费授权是9.5美元。
苹果的Retina屏的确非常的清晰分辨率高得出奇,物理尺寸的局限还是让人捉急,在室内时间较多自然要找大显示器外接上这样自然感觉是好多了,也可以按F1将屏幕全黑,另外有种比较淫荡的方法是zai 显示器耳机孔和电源附加放一块磁盘 不用合盖就可以关闭显示器,不合盖的话通过键盘可以散热,各种利弊还是自行选择吧。
yum groupremove "Mail Server" "Games and Entertainment" "X Window System" "X Software Development" "Development Libraries" "Development Tools" "Dialup Networking Support" "Games and Entertainment" "Sound and Video" "Graphics" "Editors" "Games and Entertainment" "Text-based Internet" "GNOME Desktop Environment" "GNOME Software Development"
有必要可以运行下yum grouplist看看装了那些,上面的一般能干掉一堆不怎么用的东西。
国内大多封装模板受win的习惯影响喜欢把各种东西安装进去,Linux系统做server丫不说LFS只要minimal安装就行了,节操呀.
现在需求性能效率的服务器不论是做虚拟机还是跑SQL数据库,RAID是非常不错的捷径能满足容量和IO的需求
MegaRAID系列管理套件安装
cd /tmp
wget http://down.kvm.la/RAID/MegaCliLin.zip
unzip MegaCliLin.zip
rpm -Uvh *.rpm
cp /opt/MegaRAID/MegaCli/MegaCli64 /usr/bin/MegaCli
MegaRAID系列的命令可以查看《MegaCli 常见用法》
3ware Inc系列的管理套件安装

sed-i 's/hiddenmenu/#hiddenmenu/g' /boot/grub/grub.conf
sed-i 's/splashimage/#splashimage/g' /boot /grub/grub.conf
虽然经常安装DirectAdmin但是时间长了事情多了很多东西都记不住,写好的东西都放自己电脑里面偶尔有时候还很难找到,在这儿记录一些
安装directadmin
yum -y install wget gcc gcc-c++ flex bison make bind bind-libs bind-utils openssl openssl-devel perl quota libaio libcom_err-devel libcurl-devel gd zlib-devel zip unzip libcap-devel cronie bzip2 db4-devel cyrus-sasl-devel perl-ExtUtils-Embed cd /tmp wget http://www.directadmin.com/setup.sh chmod 755 setup.sh ./setup.sh
wget -c http://down.kvm.la/kloxo/kloxo_cn.tar.gz
tar zxf kloxo_cn.tar.gz -C /usr/local/lxlabs/kloxo/httpdocs/lang
/script/update --class=sp_specialplay --name=client-admin --subaction=skin --v-specialplay_b_s_language=cn
快速简洁,干净利落。
mysql5.5采用cmake代替了configure
groupadd mysql -g 27
useradd mysql -u 27 -g 27 -c "MySQL Server" -d /home/mysql -m
wget -c http://dev.mysql.com/get/Downloads/MySQL-5.5/mysql-5.5.19.tar.gz/from/http://mysql.he.net/
tar zxf mysql-5.5.19.tar.gz
cd mysql-5.5.19
CFLAGS="-O3" CXX=gcc
CXXFLAGS="-O3 -felide-constructors -fno-exceptions -fno-rtti"
wget -c http://pecl.php.net/get/memcache-3.0.6.tgz tar xzf memcache-3.0.6.tgz cd memcache-3.0.6红色部分需要根据您的具体情况修改改,安装完后运行/usr/bin/phpize./configure --enable-memcache --with-php-config=/usr/bin/php-config --with-zlib-dir make make install echo "extension_dir = /usr/lib/php/extensions/no-debug-non-zts-20060613" >>/etc/php.ini echo "extension = memcache.so">>/etc/php.ini/usr/bin/php -m|grep memcahe
if [ `uname -i` == "x86_64" ];
then
cd /tmp
wget -c http://download.savannah.gnu.org/releases/libunwind/libunwind-1.1.tar.gz
tar zxf libunwind-1.1.tar.gz
cd libunwind-1.1
./configure
make && make install
fi
cd /tmp
wget -c https://gperftools.googlecode.com/files/gperftools-2.0.tar.gz
tar zxf gperftools-2.0.tar.gz
cd gperftools-2.0
./configure
make  && make install

echo "/usr/local/lib" > /etc/ld.so.conf.d/usr_local_lib.conf
ldconfig
将编译好的libtcmalloc.so模块加入mysqld_safe启动的时候进行动态加载
 sed -i 's/executing mysqld_safe/executing mysqld_safe\nexport LD_PRELOAD=\/usr\/local\/lib\/libtcmalloc.so/g'    /usr/bin/mysqld_safe
/etc/init.d/mysql restart
nginx不支持动态加载所以要重新编译
./configure 【其他参数】 --with-google_perftools_module
make && make install
echo "google_perftools_profiles /tmp/tcmalloc;">>/etc/nginx/nginx.conf
/etc/init.d/nginx restart
mkdir /tmp/tcmalloc/
chmod  0777 /tmp/tcmalloc/
sudo yum install glibc-static libstdc++-static
wget http://ftp.gnu.org/gnu/gcc/gcc-4.7.1/gcc-4.7.1.tar.gz
tar xzf gcc-4.7.1.tar.gz
cd gcc-4.7.1
./contrib/download_prerequisites
cd ..
mkdir build_gcc4.7.1
cd build_gcc4.7.1
../gcc-4.7.1/configure --enable-checking=release --enable-languages=c,c++ --disable-multilib
make -j24   #根据您的服务器CPU核心设置
sudo make install